
Updated June 2026 — written for operators planning or re-flowing a venue this year.
Planning your own floor? You can estimate machine count and payback with our free FEC ROI calculator in about a minute, then come back to the layout details below.
You have signed the lease on a 650-square-meter unit in a mall’s entertainment wing. The machine list is half-built, the fit-out crew starts in six weeks, and the landlord wants a layout drawing on file. Then the real question lands: where does everything actually go? Put the prize counter in the wrong corner and you build a Saturday queue that blocks your own door. Bury your best earners at the back and they sit idle while families walk past. An FEC floor plan is the difference between a floor that pays for itself and one full of dead corners.
This guide walks through how to lay out a family entertainment center floor for guest flow and earnings, the six zones most venues need, and the layout mistakes that are cheap to fix on paper and expensive to fix in concrete.
Key takeaways
- An FEC floor plan is a guest-flow tool first and a furniture map second: design the loop people walk before you place a single machine.
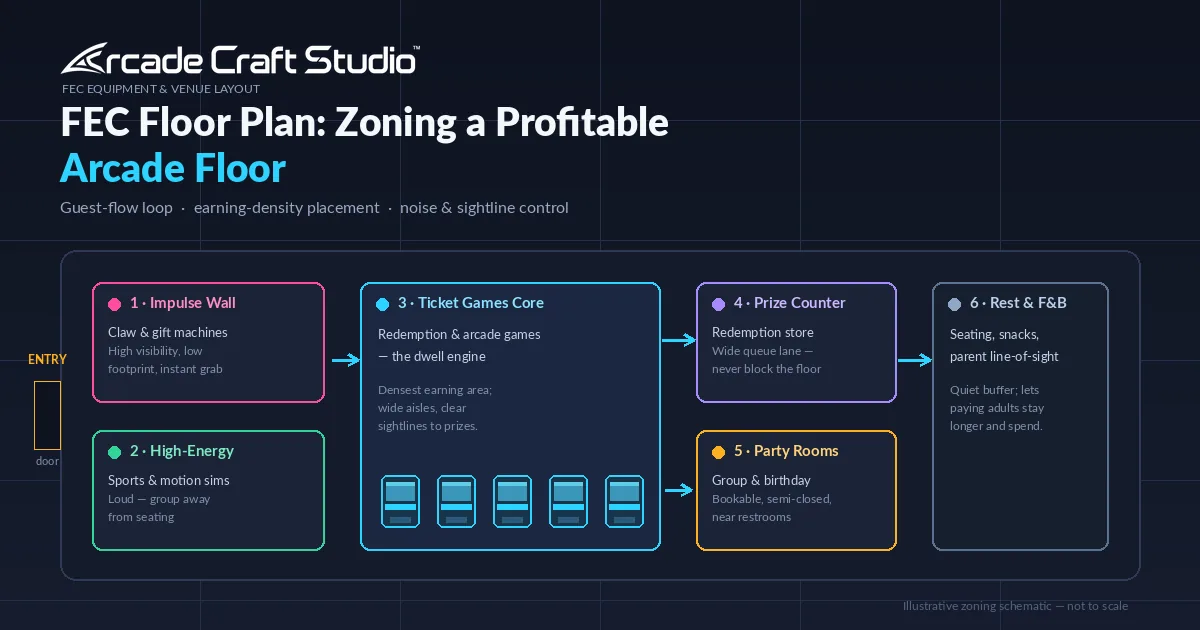
- Six functional zones cover most venues — an impulse wall, a ticket-games core, a redemption counter, a high-energy zone, party rooms, and a rest-and-food buffer.
- Earning density, not floor symmetry, decides placement: small-footprint, high-appeal machines earn the prime visible positions.
- The entrance and the redemption counter are the two most common bottlenecks; give both more circulation space than feels necessary.
- A scale drawing in 2D, then 3D, catches clearance, sightline, and queue problems before anything is built.
How to approach an FEC floor plan
Start your floor plan with the guest journey, not the equipment list. Map how a family enters, where their eyes land first, the loop they walk, and where they pause to spend. Place zones along that loop, then fit machines into the zones. Layout drives behavior, so design the behavior you want first.
In practice that means three passes before any machine is positioned. First, mark the constraints you cannot move: entrance, columns, restrooms, the service line, fire exits, and the ceiling heights that rule out tall attractions. Second, sketch the walking loop — most strong floors run a soft clockwise or counter-clockwise circuit that returns guests past the prize counter on the way out. Third, drop your zones onto that loop, and only then position machines. Arrange cabinets first and the layout serves the equipment instead of the guest, and you feel it the moment the floor gets busy.
The six zones every arcade floor layout needs
Most profitable arcade floor layouts resolve into six functional zones: an impulse wall at the entrance, a dense ticket-games core, a redemption counter, a high-energy zone for loud sport and motion machines, bookable party rooms, and a rest-and-food buffer. Each zone has a job. Mixing those jobs is where floors go wrong.
The impulse wall greets guests inside the door. Claw and gift machines shine here: small footprint, instant read, and a first spend before anyone commits to a game card. The ticket-games core is the dwell engine in the middle of the floor — the redemption and arcade games that keep families playing and reloading. Behind it, the prize counter closes the visit on a high note, which is why it needs a deep queue lane that never spills into the walking route. A high-energy zone corrals the racing, sports, and motion machines that bring noise and group energy; it works best along a side or rear wall, away from anywhere people sit. Party rooms turn birthdays and corporate groups into booked revenue, so they belong in a semi-closed corner near restrooms. Finally, a rest-and-food buffer gives paying adults a reason to stay, which quietly extends every visit. Still deciding what fills each zone? Our guide to which machines actually belong in your mix pairs naturally with this layout.
Designing for guest flow and throughput
Guest flow is the path of least resistance through your floor, and throughput is how many people that path can absorb at peak. Design both for your busiest Saturday, not a quiet Tuesday. Widen the entrance, keep main aisles clear of queues, and never let the redemption line cross the walking route.
Give the entrance a few meters of open “decompression” space so arriving guests can read the room before choosing a direction; a machine jammed against the door just creates a clog. Keep primary aisles wide enough for two-way traffic plus a stroller, and treat the redemption counter as the most queue-prone point in the building: model what happens when ten people line up at closing, and run that line parallel to the wall, not across the floor. Sightlines matter as much as aisles — a guest at the entrance should already see something they want to play, and a parent in the seating area should spot their child without standing up. A machine list will never show you any of this; a scale layout will.
Revenue per square meter: placing machines by earning density
Revenue per square meter rewards machines that earn a lot relative to the floor they occupy. A claw or gift machine has a small footprint and high impulse appeal, so it belongs in prime visible space. A large motion simulator earns well but eats area, so it anchors a zone rather than the entrance.
Score every machine on two axes: footprint, and how much it earns or attracts relative to that footprint. Then let the score, not the showroom look, decide placement. High-appeal, low-footprint machines such as claw and gift units justify the most valuable sightlines; you can see why in what a claw machine earns against the space it takes. Large attractions anchor their zones and pull traffic deeper into the floor, so they belong mid-room or along a back wall.
FEC zoning worksheet
Use this as a starting frame, then adjust to your unit’s shape and ceiling heights:
| Zone | Job on the floor | Typical machines | Placement priority |
|---|---|---|---|
| Impulse wall | Catch the eye, trigger a first spend | Claw & gift machines | Front, on the entrance sightline |
| Ticket-games core | Hold dwell time, drive card reloads | Redemption & video arcade games | Center, widest aisles |
| Prize counter | Convert tickets, end on a high | Redemption games & prize store | Back wall, deep queue lane |
| High-energy | Noise, speed, group play | Sports & motion simulators | Side or rear, away from seating |
| Party rooms | Booked group revenue | Host area + nearby machines | Quiet corner, near restrooms |
| Rest & F&B | Keep paying adults on site | Vending, seating, snacks | Buffer between noise and exit |
Common FEC floor plan mistakes (and red flags)
The most expensive of these mistakes are structural, not cosmetic: a redemption counter that bottlenecks the entrance, big earners hidden at the back, noisy machines beside parent seating, and aisles too narrow for a stroller. Most are obvious on a scale drawing and invisible in a spreadsheet of machines.
Watch for these red flags in any draft layout:
- A dead corner that no walking route passes — that floor area earns nothing.
- One entrance pinch point that doubles as the prize-redemption queue.
- A tidy, symmetrical “showroom” grid that looks neat on paper but stalls real traffic.
- Machines chosen first, with the layout reverse-engineered to fit them.
- Power and data drops on a generic grid instead of where machines actually land.
Before you finalize the plan, confirm:
- Main aisles stay clear when the redemption counter has a ten-person queue.
- Every high-value machine is visible from at least two walking positions.
- The loudest zone does not share a wall with parent seating or a party room.
- Wheelchair and stroller clearance holds on every primary route.
- From the entrance, a guest sees an attractive machine within the first few seconds.
Planning a full build rather than a single zone? Our support for arcade and FEC operators covers layout alongside machine mix and after-sales setup. For a real example, see a boutique FEC we equipped in Saudi Arabia.
Frequently asked questions
How much space do I need per arcade machine?
Plan for the machine’s footprint plus the space a player and passing traffic need, not just the cabinet size. As a working rule we leave roughly the machine’s own footprint again as clear space around it, and more for motion or racing machines that need a safety envelope. Exact clearances depend on the model, so we confirm them on the layout drawing.
Should I design the floor plan before or after choosing machines?
Sketch the zones and guest-flow loop first, choose machines second, then refine the layout around the models you select. Designing the plan around a fixed equipment list usually forces compromises on flow. Zoning first keeps the floor working even as the machine list changes.
What is the most common FEC floor plan mistake?
A redemption counter placed where its queue blocks the entrance or a main aisle. It is the single most queue-prone point in the venue, and when its line crosses the walking route it slows the whole floor on your busiest days. Give it a deep, parallel queue lane.
How wide should arcade aisles be?
Main aisles should carry two-way traffic plus a stroller, and stay clear even when a nearby counter has a queue. Secondary aisles can be tighter, but every primary route must hold wheelchair and stroller clearance. We set exact widths on the scale drawing against local accessibility requirements, which you should confirm with your own authority.
Can Arcade Craft Studio design the layout for me?
Yes. Send your floor dimensions, ceiling height, target venue type, and a machine wishlist, and our team drafts a 2D layout, then a 3D version once the zoning is agreed. We design around guest flow and earning density, and flag clearance or compliance items for you to confirm locally.
Plan your floor with us
The cheapest time to fix a floor plan is before the fit-out crew arrives. Send us your unit’s floor dimensions, ceiling height, target venue type, a machine wishlist, and the market you are aiming for, and we will turn your space into a draft 2D layout — then a 3D version once the zoning is agreed.
Free planning tool
Will your game zone pay off?
Enter your venue size, budget and visitor assumptions — get a machine mix and payback model in about a minute.